4 min read
774 words
The May 15th Deadline: Prepare for the Seasonal Shift
If you live in Ontario, you understand the routine. By mid-May, local odd/even watering restrictions typically come into play to manage municipal supply during peak heat. Relying solely on tap water creates a headache of scheduling and limitations. By prioritizing a modern rain barrel installation before the May 15th deadline, you are not just following city rules; you’re taking charge of your garden’s health.
For many years, the term “rain barrel” referred to an unattractive, bright blue plastic drum that looked out of place. Thankfully, those days are gone. We are entering a time of aesthetic integration, where your water harvesting system becomes a beautiful feature rather than an eyesore.
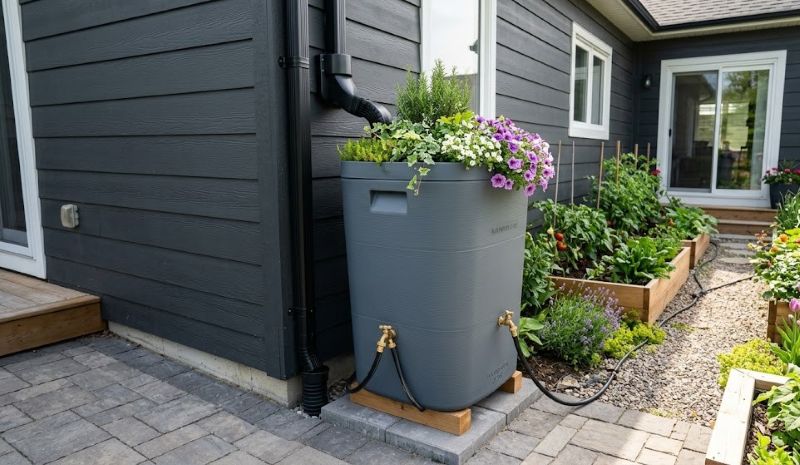
Selecting Your System: Function Meets Style
The key to a stunning garden is cohesion. Your harvesting system should look like a natural extension of your home’s architecture. This concept is called “Barkitecture,” and it is the driving force behind choosing a modern rain barrel installation that fits with the style of your siding and trim.
Designing for Curb Appeal
When choosing your new barrel, skip the standard options at hardware stores. Look for finishes and textures like Lead Foot Grey, slate, or faux-oak that blend well with your home’s exterior. Flat-back designs are also a great choice because they sit flush against the siding, eliminating awkward gaps for a clean, professional appearance. Some models even offer “living lids,” allowing you to grow cascading petunias or fragrant herbs right on top of your water reserve for a truly integrated modern rain barrel installation.
Step-by-Step Installation: The Perfect May Weekend Project
Installing your system is a doable DIY task, as long as you consider the weight. Keep in mind that a full 50-gallon barrel weighs over 400 lbs. If you place it on soft mulch, it will sink and tilt, which is why a proper modern rain barrel installation requires a solid start.
Phase 1: The Foundation
Create a stable, level base using stacked pavers or a reinforced cedar stand. This keeps the unit steady and raises it 12 to 24 inches. That height is a key part of a modern rain barrel installation because it provides the 0.5 to 1.0 PSI needed to run a low-pressure drip irrigation line, saving you from hauling heavy watering cans across the yard.
Phase 2: The Downspout Diverter
Avoid just sticking a hose in the top of the unit. A professional modern rain barrel installation should include a downspout diverter with a “first-flush” feature. This smart addition ensures that the first, pollen-heavy or dusty rainwater bypasses your barrel, keeping your stored water clean.
Phase 3: The Finishing Touches
Swap out standard plastic faucets for high-quality brass spigots. In 2026, we’ve moved beyond leaky plastic valves that break during freeze-thaw cycles. Brass is durable and adds a touch of elegance to your modern rain barrel installation.
Maintenance & Wellness: Keeping Your Water Alive

A Modern Rain Barrel Installation needs minimal upkeep, but a few habits will help keep the system healthy:
- Mosquito Prevention: Keep your mesh screens tight to prevent pests from using your barrel as a nursery.
- Algae Control: To prevent UV-triggered growth, place your modern rain barrel installation in shaded or north-facing areas.
- Dog-Safe Overflow: Never let overflow pool against your foundation. Direct your overflow pipe away from the house into a decorative rain garden filled with non-toxic, dog-friendly plants.