
6 min read
1007 words
Have you ever seen those super cool, super colorful Rainbow Loom bracelets and wished you could make one? Maybe you thought you needed one of those big plastic loom kits to do it. Well, I have a secret for you… you don’t! If you don’t have a loom, don’t worry! In this article, I’m going to teach you how you can start making amazing bracelets using just your fingers. It’s my favorite way to do it because you can make them literally anywhere. I make them in the car on road trips, at sleepovers with my friends, and even during recess at school (shhh, don’t tell my teacher!).
Are you excited? Let’s get started!
Why Finger Looming is the Best
Rainbow Looming is a totally fun craft where you weave little rubber bands together to make cool designs. While the plastic loom is great, using your fingers is awesome for a few reasons:
- You can start right now! No need to wait for a kit to arrive.
- It’s portable! Your loom is always with you—it’s your hands! Just pop a bag of rubber bands in your backpack and you’re ready to craft.
- It’s super easy to learn. I promise, once you get the hang of it, you’ll be making bracelets for all your friends.
First, Let’s Get Your Supplies!
Okay, every great artist needs their tools. For this project, our toolkit is super simple.
Here’s what you’ll need:
- Lots of Colorful Rubber Bands: This is the best part! Pick out your favorite colors, your school colors, or just a giant mix of everything to make a rainbow explosion. You can find bags of them at craft stores or on Amazon.
- A C-Clip (or S-Clip): This is a tiny piece of plastic that looks like the letter ‘C’ or ‘S’. It’s used to hook the ends of your bracelet together. Most bags of rubber bands come with a few of these inside!
- Your Fingers! Specifically, your pointer finger and your middle finger. They’re about to become your official bracelet-making machine.
Got everything? Great! Let’s move on to the fun part.
How to Make a Fishtail Bracelet: Step-by-Step Guide
We’re going to make one of the most popular and coolest-looking bracelets: the Fishtail! It looks complicated, but it’s secretly super simple.
Step 1: The Magic Figure-Eight
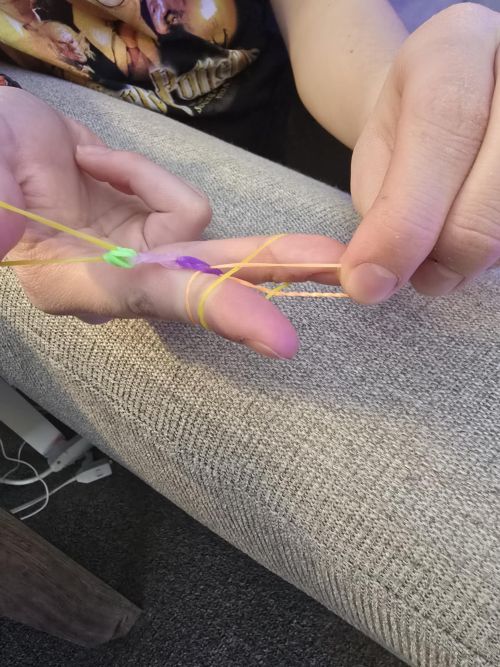
First, pick the color you want to start with. Take one rubber band and twist it in the middle to make a figure-eight shape (it kind of looks like an infinity symbol too!). Now, slide that twisted band onto your pointer and middle fingers. One loop goes on your pointer, and the other loop goes on your middle finger. This is the special starting band that holds everything together.
Step 2: Stack Two More Bands
Next, pick your next two colors. Take a second rubber band and slide it onto your two fingers, right above the figure-eight. Do NOT twist this one! Just put it on like a normal ring. Now, do the same thing with a third rubber band. You should now have three bands on your fingers: the twisted one on the bottom, and two normal ones stacked on top.
Step 3: The First Loop-de-Loop!
This is where the weaving magic begins! Look at the three bands on your fingers. Use your other hand to grab the very bottom loop (the figure-eight one) on the outside of your pointer finger. Pull it up and over your fingertip, letting it go in the middle, between your two fingers.
Awesome! Now do the exact same thing on the other side. Grab the bottom loop from your middle finger, pull it up and over, and let it go in the middle. Ta-da! You just made your first stitch!
Step 4: Add One, Loop One (The Pattern!)
Your bracelet is officially started! From now on, the pattern is so easy to remember.
- Add a new band. Grab another rubber band and slide it onto your two fingers, right on top of the other two. (You should always have three bands on your fingers before you loop).
- Loop the bottom band. Just like you did before, grab the very bottom loop, pull it up and over your fingertip, and drop it in the middle. Do this for both fingers.
That’s it! You just keep repeating this: add a new band, loop the bottom one over. Add a new band, loop the bottom one over. As you go, you’ll see a cool chain starting to form below your fingers. You can gently pull on it to see your fishtail design growing!
Step 5: Finishing Your Bracelet!
Keep going until the bracelet is long enough to fit around your wrist. You can check by carefully stretching it and wrapping it around your wrist to see if the ends meet.
Once it’s the right length, it’s time to finish it.
- Stop adding new bands. Loop the bottom band over just like normal. You should now have only one band left on your fingers.
- Carefully move the loop from your pointer finger over to your middle finger, so both loops of the last band are on one finger. This makes it easier to clip.
- Grab your C-clip. Hook one side of the C-clip through the two loops on your finger. You can now safely take your fingers out!
- Find the very first band you started with at the other end of your bracelet (the figure-eight one). It will have two little loops. Hook the other side of the C-clip through those loops.
You Did It!
You just made an amazing Rainbow Loom bracelet with your fingers! How cool is that? See? I told you it was simple.
This is just the beginning. You can try different color patterns, make matching ones for your friends, or even make necklaces and keychains by just making the chain longer.
Now that you’re a finger-looming pro, what design will you make next?
Happy looming