
5 min read
865 words
As the weather warms up and the days get longer, there’s nothing quite like the smell of barbecue filling the air. Peak grilling season is upon us, promising delicious meals and outdoor gatherings. However, before you fire up your grill and invite friends and family over, it’s crucial to remember that a well-maintained and clean barbeque grill is the key to both safety and scrumptious food. Neglecting this vital aspect can lead to fire hazards and food-borne illnesses, putting a damper on your summer fun.
This article will guide you through the essential steps to clean your barbecue grill effectively, ensuring a safe and enjoyable grilling experience. By following these tips, you can minimize risks, extend the life of your grill, and impress your guests with perfectly cooked, safe-to-eat meals.
Why Cleaning Your Grill Matters
Besides the obvious benefits of hygiene, regularly cleaning your grill offers a multitude of advantages.
- Preventing Fires: Built-up grease and food particles can ignite easily, causing dangerous flare-ups and even full-blown fires. A clean grill significantly reduces this risk.
- Avoiding Foodborne Illness: Old food residue harbors bacteria that can contaminate your freshly grilled food, leading to unpleasant illnesses. Regular cleaning eliminates these harmful microorganisms.
- Improving Cooking Performance: A clean grilling surface provides even heat distribution, resulting in consistent cooking and perfectly charred meats and vegetables.
- Extending the Life of Your Grill: Removing corrosive grease and debris prevents rust and deterioration, prolonging the lifespan of your grill and saving you money in the long run.
How to Clean Your Barbecue Grill: A Step-by-Step Guide
Now that you understand the importance of a clean grill, let’s dive into the practical steps you can take to keep it in tip-top condition.
Step 1: Gather Your Supplies
Before you begin, assemble the necessary tools and cleaning agents:
- Grill Brush: Choose a sturdy grill brush with stainless steel bristles for effective cleaning.
- Scraper: A metal scraper can help remove stubborn residue from the grates.
- Warm, Soapy Water: A solution of warm water and dish soap is ideal for general cleaning.
- Spray Bottle: For applying the soapy water solution.
- Gloves: Protect your hands from grease and grime.
- Paper Towels or Rags: For wiping down surfaces.
- Optional: Grill Cleaner: For tougher stains and grease buildup (ensure it’s grill-safe).
- Optional: Wire Brush for Burner Tubes: To clean out clogged burner tubes.
Step 2: Burn Off the Residue
The first step is to burn off any remaining food residue on the grates. Close the lid and turn your grill to high heat for about 15-20 minutes. This will carbonize the leftovers, making them easier to remove.
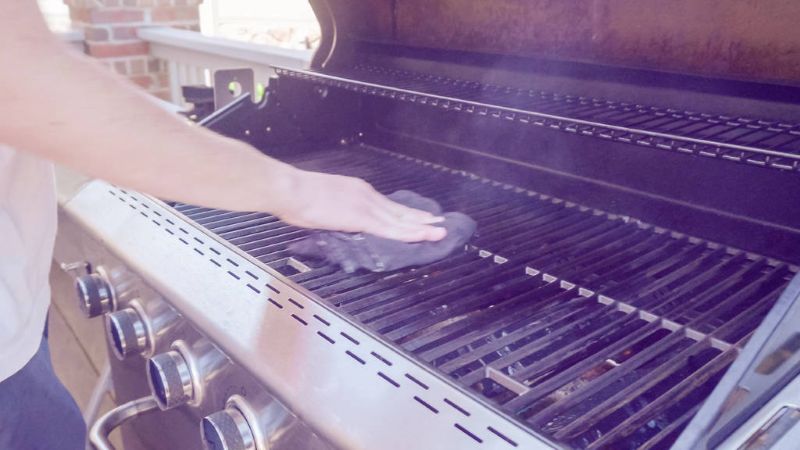
Step 3: Scrub the Grates
Once the grill has cooled down slightly (but is still warm), use your grill brush to scrub the grates thoroughly. Apply firm pressure and work the brush back and forth to remove the charred residue. For stubborn areas, use the scraper to loosen the debris before scrubbing.
Step 4: Clean the Interior
After cleaning the grates, it’s time to tackle the interior of the grill. Remove the grates and use a scraper and brush to remove any grease and debris from the bottom of the grill and the side walls. Dispose of the collected debris in a metal container.
Step 5: Clean the Burner Tubes (Gas Grills)
For gas grills, check the burner tubes for any blockages. Use a wire brush or pipe cleaner to clear any obstructions that might be hindering the gas flow. This will ensure proper and even heating.
Step 6: Wash with Soapy Water
Use a spray bottle to apply the warm, soapy water solution to the grates and the interior of the grill. Let it sit for a few minutes to loosen any remaining grease. Then, scrub the grates and the interior with the grill brush and wipe them down with paper towels or rags.
Step 7: Rinse and Dry
Rinse the grates and interior with clean water to remove any soap residue. Thoroughly dry all the components with paper towels or rags before reassembling the grill.
Step 8: Reassemble and Season the Grates
Once everything is clean and dry, reassemble the grill. Before your next grilling session, consider seasoning the grates with a high-heat cooking oil. This will prevent food from sticking and make cleaning easier in the future.
Maintaining a Clean Grill: Tips and Tricks
Cleaning your grill regularly is crucial, but so is maintaining its cleanliness between uses. Here are a few tips to help you keep your grill in top shape:
- Clean After Each Use: After each grilling session, give the grates a quick scrub with the grill brush while they are still warm.
- Empty the Grease Trap: Regularly empty the grease trap to prevent grease buildup and potential fires.
- Cover Your Grill: When not in use, cover your grill to protect it from the elements and prevent dirt and debris from accumulating.
- Deep Clean Regularly: Perform a deep clean as described above at least twice a year, or more frequently if you grill often.
By following these steps and tips, you can ensure a safe, enjoyable, and delicious grilling season. So, fire up your grill with confidence, knowing that you’ve taken the necessary precautions to protect yourself, your loved ones, and your taste buds! Happy grilling!
I just did my Barbeque yesterday for the Victoria Weekend. I usually fire it up first and let it burn for 30 mins or more just to make it easier to wipe out and of course kill any creepy crawler’s that might have snuck in. Than I tear it down clean the grease trap and when finished wipe the grill and burners down with olive oil. Makes it shine like new!
Great tips on cleaning the barbecue grill!
Thanks for the tips.
I found your insights on preventing tick bites very useful!